Why choose LIVALL PikaBoost2?

No Tools Needed
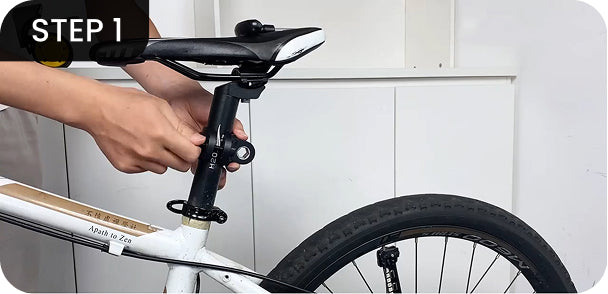
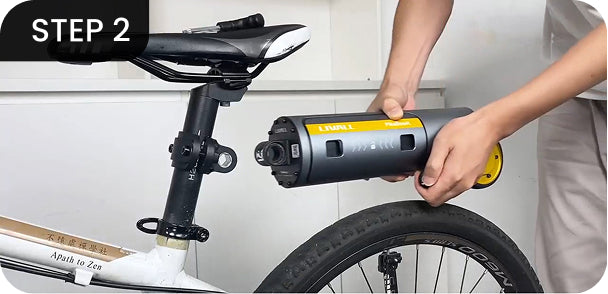
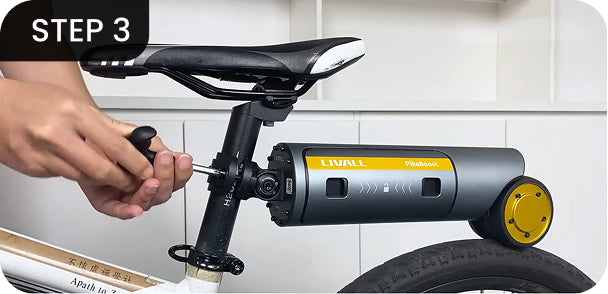
30-Second Installation
Snap it on—no tools, no wires, no stress.

One device, endless possibilities
Fits Every Lifestyle
From city commutes to senior leisure, PB2 is simple, safe, and always ready.

Smooth power, smarter ride
Smart Algorithm Control
Up to 500Wh boost on climbs, smooth and safe on every ride.

One device, any bike
Universal Bike Compatibility
Works with any bike—small wheels, big wheels, even folding.

Safe power, global compliance
Smart Safety
Safe power, modular design, global e-bike compliance.

Here, it’s a joy. You press the pedals with exactly the power you want, and the bike just… keeps that speed—the speed you brought it to. It feels wonderfully, effortlessly smooth.

I think that PikaBoost 2 does have a place in the market, it's for the person that wants to get out and ride a conventional bike but doesn't want to bust their ass up all the hills and they want to go a little bit further and it has a handful of features that are really useful. I'm going to add this thing to my collection of electric toys.

Sometimes when I’m riding a bicycle, there are days when I don’t want to ride. If you want to try this product, you will enjoy riding even more, and overcome these moments in a fun way. This really is a very fun product.
30-Second Installation
Traditional kits
8 Steps / 1-2 Hours
Complicated DIY
Smart Algorithm Control. Powerful Edition
The quiet confidence behind every ride.You set the pace, it tidies the rest. A discreet guardian that turns worry into flow and momentum into ease.
Essentials, Perfected. Lite Edition
A lighter PB2 for everyday flow. Quick to mount. Simple to use.
Fits Every Lifestyle
PikaBoost 2 keeps your flow on daily routes. Natural assist, Slip Detection that tempers power when grip fades, V-shape tires that hold the line, and an LED rear light that keeps you seen.
Universal
Bike Compatibility
Others:

PB2:


Power you can trust, protection you can feel—PB2 keeps rides smooth, legal and worry-free, from commutes to adventures.
| Feature | Traditional Conversion Kit | PikaBoost2 |
|---|---|---|
| Power Safety | ⚠ Overpowered, risk of overload | ✅ Optimized Wattage — stable output, safe for daily commutes |
| Battery Safety | ❌ No BMS, risk of overcharge or short-circuit | ✅ Smart BMS — dual protection, longer battery life for years of riding |
| Regulatory Compliance | ❌ Limited, only some regions | 🌍 Global Compliance — certified road- legal, ride worry-free anywhere |
| Maintenance & Safety | 🔧 Complex parts, hard to fix, safety risks | ✅ Modular Design — quick swap, easy fixes, no ride interruptions |
|
Motor Power
|
Continuous 250W / Peak 500W | Continuous 250W / Peak 500W |
|
Battery Capacity
|
158 Wh | 220 Wh |
|
Range (Assist Mode)
|
Up to 50 km / 31 miles | Up to 70 km / 43 miles |
|
Charging Time
|
3 hours (65W fast charge) | 4 hours (65W fast charge) |
|
Battery Longevity
|
80% capacity after 1,000 cycles | 80% capacity after 1,000 cycles |
|
Battery Weight
|
1 kg / 2.2 lbs | 1 kg / 2.2 lbs |
|
Battery Voltage
|
21.9V | 21.6V |
|
Total Weight
|
3 kg / 6.6 lbs | 3 kg / 6.6 lbs |
|
Top Speed
|
25 km/h (15 mph) | 32 km/h (20 mph) |
|
Waterproof Rating
|
IPX5 | IPX5 |
|
App Compatibility
|
Android & iOS | Android & iOS |
What is the warranty period for the LIVALL PikaBoost 2?
The LIVALL is backed by a 1-year limited warranty for our US-based backers, while users in other countries and regions will be subject to their respective national policies.
How can I get in contact with you?
Please email us at user@livall.com or send a post to this group if you have any questions. Our customer service team will be happy to assist you and reply ASAP.
What is the maximum power of the PikaBoost 2 motor?
PikaBoost 2 motor delivers a peak power of 500W and can reach speeds up to 32 km/h (20 mp/h), letting you effortlessly tackle hills and enjoy a more thrilling ride.
What’s the battery capacity?
The PikaBoost 2 offers two battery options: a 220Wh model for extended rides up to 70 km (43 mi) and a 158Wh version that's airline-approved with a 50 km (31 mi) range.
*Actual range may vary depending on user weight, road conditions, and the mode of use.
Is the battery of PikaBoost 2 replaceable?
Yes, the battery is replaceable. PikaBoost 2 uses 18 lithium batteries (18650 type), which meet RoHS environmental standards.
How long does it take to fully charge PikaBoost 2? And what is the battery longevity?
The 158Wh version takes approximately 3 hours to fully charge, while the 220Wh version takes around 4 hours.
As for battery longevity, the batteries retain about 80% of their capacity after 1,000 charge cycles.
Our product includes a fast charging cable. For optimal fast charging performance, we recommend using a 65W charger.
What are the four riding modes of the PikaBoost 2?
-Standby Status: PikaBoost 2 doesn't engage in assisting the bike.
-Assist Mode: Adjust power assistance based on your pedaling frequency. Faster pedaling triggers stronger assistance on flat terrain and gentle slopes. 2 power levels for your option, effortlessly adjustable with the remote controller.
-Cruise Mode: Provides continuous, steady power as you pedal to a certain speed, ideal for relaxing commutes or short trips. Switch between assist and cruise mode is easier than ever with the remote controller.
-Workout Mode: With added resistance, transforming a regular bike into a training machine, ideal for both indoor and outdoor workouts.
Why should I choose the PikaBoost 2?
The LIVALL PikaBoost 2 is a conversion kit that effortlessly transforms any bike into an e-bike. With just a fast and firm installation, you'll experience immediate and powerful assistance, allowing you to ride farther and enjoy a smoother, easier journey. PikaBoost 2 also features a 500W peak motor power, and AAR2.0 patented assist technology that delivers more precise and timely support. Plus, with five folds of safety protection, your ride is not only more convenient but also safer.
What are the input and output power ratings for charging?
PikaBoost 2 supports bi-directional fast charging using PD 3.0 technology, with a maximum input of 65W and output of 100W. This means you can use its battery to charge your other devices such as your phone, smartwatch, and laptop, just like a mini portable power bank.
Can PikaBoost 2 be used with any type of bicycle?
PikaBoost 2 offers various mounting angles, making it compatible with any tire size and fitting bikes from 14 to 29 inches. Additionally, our optional battery pack comes with both mountain bike and road bike tires to better meet the needs of different bike models and riding styles.
What is AAR2.0 technology? What kind of riding experience can it provide me?
PikaBoost 2 features its own Automatic Adaptive Rate (AAR 2.0) technology, which adjusts motor assistance in real-time based on how hard you pedal, your speed, and the steepness of the terrain. Our technology is more sensitive and accurate compared to those that use torque and sensor-based methods. As you accumulate riding data, it becomes increasingly responsive.
With the assistance of PikaBoost 2, how far can I ride at most?
You can ride up to 50 km (31 miles). With the optional 220Wh replacement battery, you can extend your ride to as far as 70 km (43 miles), providing an extended range to meet more of your exercise needs.
Will it meet local regulations?
We specifically included this adjustment in the app to ensure compliance with each region’s laws and regulations. When you first install and pair your PikaBoost 2 with the app, it will automatically recognize your location and adjust the maximum speed to comply with local regulations. This means that when you use PikaBoost 2 in Europe, your maximum speed, even with the assist, will be capped at 25 km/h.
How do I switch between different riding modes?
With the remote controller, you can switch between Cruise Mode and Power Assist Mode. For the other riding modes, you'll need to use the PikaBoost 2 app to make the switch.
Can I use PikaBoost 2 in rainy weather?
Yes, both the motor and battery have an IP66 protection rating. It's easy to clean if it gets dirty—just rinse it with water without needing to disassemble. However, we recommend using the PikaBoost 2 in light rain rather than heavy rain. Additionally, PikaBoost 2 has slip detection, which automatically stops power output if slipping is detected to ensure your safety.
Using the remote control, you can switch between cruise mode and assist mode. For other riding modes, you need to switch using the PikaBoost 2 app.
When the device has low battery, it will automatically switch to standby mode.
We recommend giving the bicycle an initial speed before climbing, then using PikaBoost's assist to help with the climb. This will make the ride feel significantly easier. For uphill starts from a standstill, the assist activates only when the speed exceeds 5 km/h, so the assist effect may not be as noticeable.